–> Auch auf deutsch verfügbar!
In this article, we will explore the process of installing printer drivers using Microsoft Endpoint Manager (MEM) and pnputil.exe. Printer driver installation is an essential step in configuring printers on Windows devices, and MEM provides a convenient way to streamline the deployment process. We will also discuss the usage of pnputil.exe, a command-line tool that allows for the management of device drivers on Windows.
On clients without local admin rights, it is not possible to download and install drivers, for example, from a print server. To address this issue, I have developed a procedure for installing drivers on clients using pnputil.exe.
Prerequisites
To perform the driver installation using pnputil.exe, you will need the following:
- Driver files from the manufacturer: You need the driver files provided by the manufacturer, specifically the .INF and .CAT files. These files contain the necessary information for installing the driver.
- PowerShell environment: You will need a PowerShell environment to execute the commands. You can use tools like Visual Studio Code, PowerShell Integrated Scripting Environment (ISE), or any other PowerShell-compatible environment.
- Microsoft Win32 Content Prep Tool: This tool is used to prepare the driver package for installation. It ensures that the driver files are properly signed and ready for installation.
Make sure you have the necessary permissions and access to Microsoft Intune.
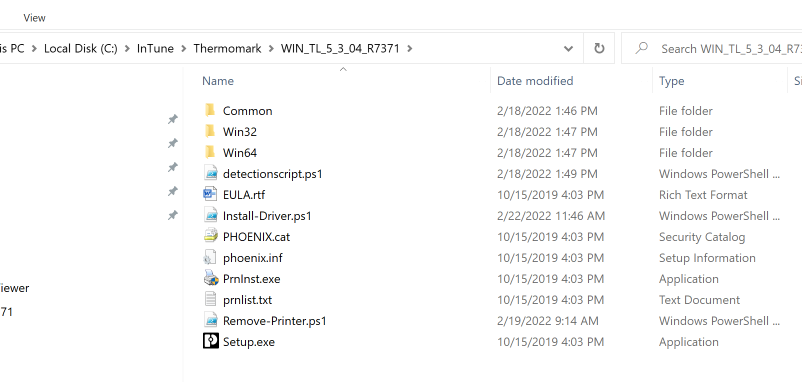
Unpack the drivers
We download the drivers from the printer manufacturer and unpack them in the desired path. In the folder where the installation file is located (*.INF) we create 3 PowerShell scripts:
- Install-Driver.ps1
- Remove-Driver.ps1
- Detectionscript.ps1
Install-Driver.ps1
To install the driver on the client, we use the pnputil.exe tool. We invoke it using the „Start-Process“ command in PowerShell and provide the necessary arguments along with the installation file. Once the driver is loaded with pnputil, the desired driver can be added using the „Add-PrinterDriver“ command. If a driver package contains multiple printer drivers, all desired drivers can be added, of course.
Since we package the script into a WIN32 app, Intune defaults to launching a 32-bit PowerShell during distribution. However, this version cannot execute pnputil.exe. Therefore, at the beginning of the script, we need to specify that the script should be run in 64-bit PowerShell.
In my example, I am using drivers from the THERMOMARK printer series by Phoenix.
#starts script in 64bit powershell
If ($ENV:PROCESSOR_ARCHITEW6432 -eq "AMD64") {
    Try {
        &"$ENV:WINDIR\SysNative\WindowsPowershell\v1.0\PowerShell.exe" -File $PSCOMMANDPATH
    }
    Catch {
        Throw "Failed to start $PSCOMMANDPATH"
    }
    Exit
}

#install driver
#pnputil arguments
$INFARGS = @(
    "/add-driver"
    "PHOENIX.inf"
)

Start-Process pnputil.exe -ArgumentList $INFARGS -wait -passthru
Add-PrinterDriver -Name "THERMOMARK ROLL 2.0"
Add-PrinterDriver -Name "THERMOMARK CARD 2.0"
Printer driver without trusted certificates
There are printer drivers that are not classified as trusted by Windows by default. This must first be confirmed during installation.
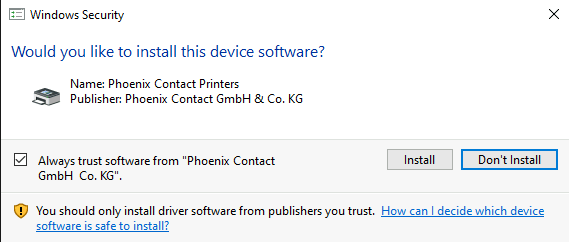
In an Intune installation this user interaction is not desired and also not possible, because local admin rights are necessary. However, we can solve this by exporting the certificate from the *.CAT file in the Powershell script beforehand and saving it in the certificate store under „Trusted Publisher“.
So we now have a script that installs printer drivers using pnputil.exe.
#starts script in 64bit powershell
If ($ENV:PROCESSOR_ARCHITEW6432 -eq "AMD64") {
    Try {
        &"$ENV:WINDIR\SysNative\WindowsPowershell\v1.0\PowerShell.exe" -File $PSCOMMANDPATH
    }
    Catch {
        Throw "Failed to start $PSCOMMANDPATH"
    }
    Exit
}

#transfer driver certificate to local trusted cert store
$signature = Get-AuthenticodeSignature PHOENIX.cat
$store = Get-Item -Path Cert:\LocalMachine\TrustedPublisher
$store.Open("ReadWrite")
$store.Add($signature.SignerCertificate)
$store.Close()

#install driver
$INFARGS = @(
    "/add-driver"
    "PHOENIX.inf"
)

Start-Process pnputil.exe -ArgumentList $INFARGS -wait -passthru
Add-PrinterDriver -Name "THERMOMARK ROLL 2.0"
Add-PrinterDriver -Name "THERMOMARK CARD 2.0"
Remove-Printer.ps1
Uninstalling program packages is also important for smooth operation via Intune. Thus, the uninstallation of old printer drivers that are no longer needed can also be realized. For this purpose, we again use pnputil.exe and the same approach as for the installation.
If ($ENV:PROCESSOR_ARCHITEW6432 -eq "AMD64") {
    Try {
        &"$ENV:WINDIR\SysNative\WindowsPowershell\v1.0\PowerShell.exe" -File $PSCOMMANDPATH
    }
    Catch {
        Throw "Failed to start $PSCOMMANDPATH"
    }
    Exit
}
#delete driver
$INFARGS = @(
    "/delete-driver /force"
    "oemsetup.inf"
)

Start-Process pnputil.exe -ArgumentList $INFARGS -wait
Remove-PrinterDriver -Name "THERMOMARK ROLL 2.0"
Remove-PrinterDriver -Name "THERMOMARK CARD 2.0"
Detectionscript.ps1
In order for Intune to recognize that the operation was successful after installation, we need to upload a detection script to Intune during deployment. This script checks if the printer drivers are found via PowerShell. If you install multiple drivers, all drivers must also be included in the detection.
This could then look like this, for example.
IF ( (Get-PrinterDriver| Where-Object {($_.Name -Match "THERMOMARK ROLL 2.0")})`
 -and (Get-PrinterDriver| Where-Object {($_.Name -Match "THERMOMARK CARD 2.0")})){
  $True
}
Packaging
Now we have all the necessary files and scripts and can package the Intune package. It is important for the packaging that all scripts are in the folder with the *.INF and *.CAT file.
The detection script does not need to be packed as it is uploaded to Intune separately.
Once the folder is complete, we launch the Microsoft Win32 Content Prep Tool and enter all the relevant information:
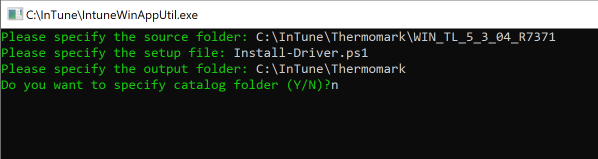
The tool now packs us an Install-Driver.intunewin file that we can upload to Intune.
Microsoft Endpoint Manager settings
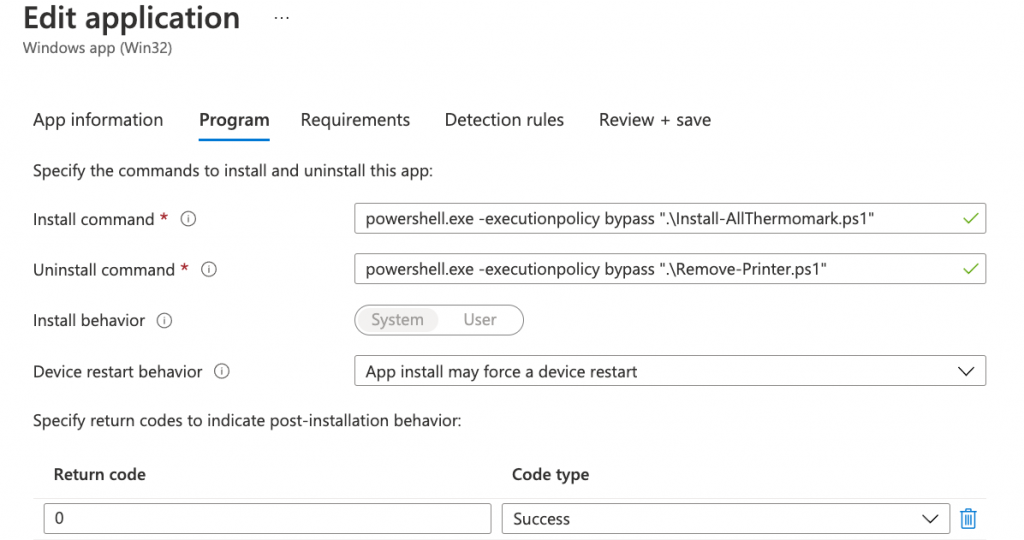
We now upload our INTUNEWIN file as Win32 App in Endpoint Manager and give the package the desired name.
Under the item „Program“ we enter the installation command
powershell.exe -executionpolicy bypass ".\Install-Driver.ps1"as well as the uninstall command.
powershell.exe -executionpolicy bypass ".\Remove-Printer.ps1"In the end, it should look something like this:
Under the prerequisites, Windows must be entered as 64-bit architecture. The operating system version should always be in the supported range. In my case, I have specified Windows 10 20 H2.

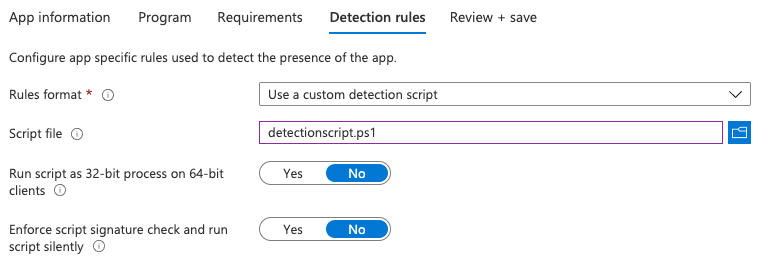
In the next step we upload our Detectionscript.ps1.
Now you just need to assign the package to the appropriate users, devices or groups. Of course, as always, before you roll it out, test it extensively on a few machines.
Have fun building it!
If you have any questions, feel free to contact me.
2 Kommentare